
Tips for a Perkier Butt and a Flatter Midsection
Dec 20, 2019Ways to Improve Your Postural Alignment
You know the saying when someone has worked really hard at something and you say, ‘She really worked her butt off!’ I joked about that after I had my first child as I remarked at my really flat butt! ‘I birthed my butt off!’ I would say…
That was before I knew about why my butt ‘fell off’. In fact what had happened was my alignment had changed so much in my pregnancy that I became a tailbone tucker, and pelvis thruster and a chest gripper.
Actually, I am pretty sure I went into my pregnancy not well aligned with already weak glutes and then when I added pregnancy into the ‘messed up core’ mix I became even more unaligned (not sure if that's a word but it is now!).
That was 14 years ago… I went on to have a second babe in 2007 and it was after he was born that I found out about diastasis recti. I was already immersed in the pelvic floor world and after reading about diastasis, I started piecing information together and seeing how closely tied they are.
I began to seek out as much education as I could and I became a bit of a course junkie. I learned from Katy Bowman (completed my RES certification in 2017), Diane Lee, Julie Wiebe to name a few and could not get enough knowledge!
It was then that I looked more closely at my own alignment and posture and started to make some changes. Slowly, very slowly, I noticed subtle changes and can now proudly say that I have a booty again – even bootier than it was before pregnancy!
I began playing around with release work and strength work and alignment work and slowly but surely my body responded. I then started incorporating this into my work with clients and they started to notice improvements too!
I brought breath work into the picture and it really opened my eyes to the role of the diaphragm in relation to the pelvic floor and diastasis. And for the diaphragm and pelvic floor to work optimally, guess what? They need to be aligned.
The Benefits of Optimal Alignment
When we are in optimal alignment our core is ‘free’ to do its many jobs and we don’t have to think about it. The posture we live and move in along with pregnancy and childbirth and surgery and accidents… and… and… all contribute to non-optimal alignment and when we are not optimally aligned then core function is hindered.
Typical signs core challenges are incontinence, a belly that won't flatten, back pain, pelvic pain, hip pain and organ prolapse. Once the core has become dysfunctional you need to retrain it (and that starts with alignment) before you train it.
Here are some of the alignment principles that I have learned along the way;
It Starts With the Feet
Feet that are well aligned and not confined to shoes with heels and pointy toes are better able to give us a good starting point – I have been wearing minimal shoes for close to 10 years now Vibram’s, Lem's and more recently Altra Runners are my faves! (I am in no way affiliated with these companies and will not make any money if you click and decide to buy). Transitioning to minimal shoes takes some time. Start by wearing them for 15-30 minutes per day and gradually building up from there. Do not ditch your old shoes and go cold turkey or you will experience some aches and pains and potential injury.
Lengthen Your Backside
Calf and hamstring stretches are given to every one of my clients and are part of my personal routine. When our posterior muscles are tight, the pelvis doesn't have as much freedom to be in neutral and will start to live in a more tucked position.
Release the Tense Butt
One of my favourite releases to give my clients is the posterior pelvic floor release. I have my client sit on a hard surface chair and then I give them a ball – a tennis ball or a yoga tune-up ball or sometimes a franklin ball if they are really tight.
I have them lift up one butt cheek and find the sitz bone and then put the ball in between that sitz bone and their anus – not a huge space – then I have them leave the ball there and put that butt cheek back down.
The result is usually a crooked client who ‘looks’ like they are sitting on something. The key is to be able to let go of the tension in the glutes and the posterior pelvic floor so that they can sit on the ball without me knowing they have a ball there.
Rather than a rigid tense muscle that is on top of the ball, I get them to release and soften and let go so that the muscle wraps around the ball. Once you do one side (holding it for 30, 60, 90 seconds) then take the ball out and feel the space and the soft, spread out the goodness in that side of your bum. Then repeat on the other side.

Release the Tight Obliques
A common strategy many women use for core stability is to overuse their obliques which results in a rigid rib cage that is not able to sit where it should or allow the breath to go where it needs to go.
One of my favourite stretch/release to give is the thoracic stretch – love this stretch for releasing the side body, the shoulders, the neck, the upper back – it is awesome!

Stack the Pelvis
Once the butt gripping and chest gripping are released then the pelvis and rib cage have an easier time aligning themselves.
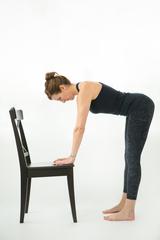
You can see in the image below a good example of the pelvis living ahead of the rib cage rather than under the rib cage. You can also see the tucked bum and the forward angled legs.
Also, notice the breasts and belly – in the image on the left they appear to be touching the lamp in the background and when she is properly aligned you can see the space on the wall. She also has a perkier butt too!
When the pelvis is stacked under the rib cage then the diaphragm and pelvic floor work in synergy and the deep abdominals are ‘on’ as they work to support the body.

Sit Less, Move More
I got a stand-up workstation about four years ago and alternate between standing there, sitting on a chair and sitting on the floor (v-leg sit with my laptop on a small bench in front of me, straddling a bolster with the laptop on the bench).
I also try to limit the amount of time I am in one of those positions – I work from home so am fortunate to be able to do a load of laundry or take a walk outside or clean the house as part of my movement breaks.
There are a lot of amazing stand-up workstations available now – why not try and get them into your workspace?
When You Must Sit, Sit on Your Sitz Bones
There are many times that we need and want to sit but unfortunately, most chairs encourage a tucked under tailbone such as cars and theatre seats and waiting room chairs and desk chairs.
Even though the chair wants you to slouch, you can still make some adjustments so that you sit in a more neutral position.
Put the front of your car seat down as low as it can go and put the back up nice and tall. Then add a rolled-up towel or wedge of some sort under your butt so your pelvis tilts more anteriorly instead of posteriorly – sit on your sitz bones.
You can do the same in a movie theatre at home or at work – once you have the awareness of how you sit, you can take steps to sit better or not sit as much.
We can encourage this in our kids too – I cringe when I see my kids slouching during their screen time and am constantly getting them to adjust and move.
Slouching is OK – Sometimes
There are times when we want to laze around on the couch or lounge back in a muskoka chair and that is ok! It is when we ‘live’ in that slouched position day in and day out that it becomes a problem.
Allow yourself the freedom to slouch on occasion but choose to live well aligned for the majority of your day.
Baby Steps
It took years to get out of proper alignment and it may take years to get back into it – take it easy on yourself and recognize the accomplishments you make. Alignment is the by-product of how your hold yourself during the day. The optimal alignment will come when you release tight muscles, sit less, move in varied ways and choose good posture throughout the day.
Choose one element to work on and dedicate a week or two just to that element rather than buying barefoot shoes, getting a stand-up workstation, releasing your butt and chest, stacking your ribs and pelvis and never slouching all in one day.
Go slow, take baby alignment steps – it will happen.
What's Next?
Once you are in optimal alignment, you can use my favourite go-to exercise, the Core Breath. Then you can add it into movement so your core is coordinated (or core-ordinated as I like to say) and life is good!
It’s all about the ABC’s – Alignment, Breathing, Coordination.
Check out my 28 day Kegel Challenge - the results women have in as little as 14 days are incredible! Less back pain, no more leaking, they ditch the pads, they feel stronger, they notice more definition in their abs... crazy awesome results! Find out what it can do for you!
If you enjoyed this article, you might also like our episode:
Biohacking Tips From Zora Benhamou
Listen to the episode


